Monday 14 November 2011

How to hard reset the HTC Desire?

We show you how to factory reset the HTC Desire to clear all data and restore its original settings
The HTC Desire is highly customizable and you have been hard at work tweaking it to your liking, but now the fun is over and you want to return it to its factory settings again. Here, we show you how to hard reset the HTC Desire with step by step instructions.
Please note that all data will be deleted from the HTC Desire as a result of this procedure. This process does NOT delete data stored on the microSD card. We recommend backing up all of your personal data before proceeding.
1.Turn the power off. If your HTC Desire is frozen, pull the battery out and reinsert it
2.Hold the Volume Down button3.Press and release the Power button4.You are now presented with a menu that allows for Fastbook, Recovery, Clear Storage, and Simlock
5.Select Clear Storage by pressing the Volume Down button6.Press and release the Power button7.Now simply confirm your decision: Volume Up for YES and Volume Down for NOIf you selected YES, all data including third-party applications will be deleted from the HTC Desire. Once the wipe is complete, the phone will reboot to its factory fresh state.

Thursday 30 June 2011

.: GsmXplorer :.: How to hard reset the Dell Streak

.: GsmXplorer :.: How to hard reset the Dell Streak: "We show you how to factory reset the Dell Streak to clear all data and restore its original settings The Dell Streak is highly customizable..."

Saturday 25 June 2011

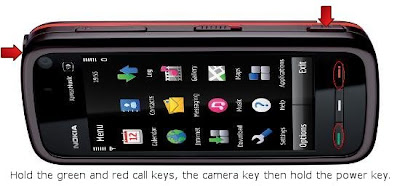
.: Hard Reset Nokia 5800,5233,5235,5230, :.

Hold the Green and Red call keys, the Camera capture key and then the Power key, hold them untill the device boots up on set your country.


.: Nokia N97-N97Mini Hard Reset :.

Steps :.
Hold the left Shift key, the Spacebar and the Back key then the Power key, hold them until the device shows On startup Set country and time.


Regards
GsmXplorer

Tuesday 21 June 2011

:. How To Format Nokia Communicators :.

Formatting
9210i Remove the battary

Hold down Ctrl + Shift Keys

Put in the battary

Keep waiting and holding the Ctrl + Shift Keys

When you see the nokia hands logo press ( F )


Format 9300 , 9300i ,9500
Steps,
* Remove the battery for 10 seconds
* Replace the battery
* Open the Nokia 9300 to view the inside display
* When you see the screen with "NOKIA" in blue text,
* Press and hold the following four keys until a Format Message is displayed:
CRTL + Shift + F
* Confirm the process by selecting Format
* Formatting will begin
* After formatting is complete the Nokia 9300 will reboot with some basic settings. If prompted, accept the request to reboot
* Follow the instructions on your Nokia 9300 to set the time, date and city and to enter your contact information.


Regards.
GsmXplorer

Wednesday 1 June 2011

Contacts Transfer from Nokia to Blackberry.

Download the latest version of Nokia PC Suite to your
http://www.nokia.co.in/support/product_support/nokia-pc-suites computer  Connect your nokia phone to the computer. Syncronize contacts to mircrosoft outlook.

Blackberry Desktop Manager Link
http://us.blackberry.com/apps-software/desktop/

Then instal the blackberry desktop manager software to your computer. On your blackberry handset, then go to contacts, select options, select desktop, change wireless syncronization to "NO", save changes and exit contacts.

Open Blackberry Desktop manager on your computer. Connect the Blackberry phone to your computer with a cable, select no mass storage mode on the handset. Select outlook profile on your computer if it prompts.

On the computer Select Syncronization,  then select syncronization under the Configure menu listed on the left. Then configure syncronization settings for my desktop program. A new window will open, select adress book, double click it, set application to outlook, click next, select one way sync to device, click next, select outlook profile, click finish. Press ok, ok and return to main  window. Select syncronization, press syncronization button in the centre of the window. Wait for contacts to be transferred to your handset, and you are done

Regards
GsmXplorer

How ToTransfer Contacts From Nokia Phone To Apple iPhone:.


I had to move my contacts from my old Nokia Phone into my new Apple iPhone. To do the same, there are a few methods I could use. In this article I will share the two easy methods and with which you can transfer contacts from Nokia Phone to Apple iPhone.

There are two methods one which involves copying from SIM, without using a computer, the other method involves using Nokia PC Suite, Microsoft Outlook and Apple iTunes Software.

Without Using Computer


For transferring contacts without using computer, you need to copy all your phone contacts to your SIM from a Nokia Mobile. Insert the SIM that you want to use with Apple iPhone into your Nokia Phone. On your Nokia mobile, go to

Menu > Contacts > Options > Copy > All Contacts > Keep Original

This will start copying of Nokia Phone Contacts into your SIM card. Once it is finished copying, Insert this SIM card back into the Apple iPhone. On Apple iPhone go to

Home > Settings > Mail,Contacts,Calendar > Import SIM Contacts

import-sim-contacts

and your iPhone will copy all the contacts on the SIM that you have put on it from Nokia mobile. That is all, simple, isn’t it?

Using Outlook , Nokia PC Suite and iTunes


For geeks who keep all their phones synced and wan to do it in a sophisticated way, here is the method. You need to Install Nokia PC suite and connect your Nokia Phone to your computer using data cable / Bluetooth or wi-fi, whatever way it allows you to.

if you face problem in connecting phone to Nokia PC suite, see this article:
Problem Connecting Nokia Phone With Nokia PC Suite

You need to have MS outlook or outlook express installed on your computer. You can simply open the Nokia PC Suite, connect it with your phone, and Synchronies the contact with your MS outlook, this will transfer all your phone contact to MS outlook.
synchronize-nokia-phone

Once this is done, close the Nokia PC suite, disconnect Nokia Phone from computer.
Connect the Apple iPhone and launch iTunes software. Click on your iPhone Device in the left tab on iTunes then it will show the summary of your iPhone and now click the Info tab.
info-tab-apple-iphone
Synchronize the contacts with MS outlook. This will copy all your Outlook contacts you synced with Nokia Phone into your Apple iPhone. You can do vice-e-versa as well with any other phone.

Hope you find this post easy and interesting. Please let us know your suggestions and comments if you have a better way of doing it.

Regards
GsmXplorer

Monday 21 March 2011

GsmXplorer `` We eXploring the knowledge...: How to hard reset the Dell Streak

GsmXplorer `` We eXploring the knowledge...: How to hard reset the Dell Streak: "We show you how to factory reset the Dell Streak to clear all data and restore its original settings The Dell Streak is highly customizable ..."

How to hard reset the Dell Streak

We show you how to factory reset the Dell Streak to clear all data and restore its original settings
The Dell Streak is highly customizable and you have been hard at work tweaking it to your liking, but now the fun is over and you want to return it to its factory settings again.
Here, we show you how to hard reset the Dell Streak with step by step instructions.
Please note that all data will be deleted from the Dell Streak as a result of this procedure. This process may or may not delete data stored on the microSD card. We recommend backing up all of your personal data before proceeding.
First, try this:

1.From the main home screen, tap menu
2.Tap Settings, then Privacy
3.Tap Factory data reset
4.Tap Reset device
5.Tap Erase everything

If that doesn't work, or if your phone is frozen:

1.Turn the power off.
 If your Dell Streak is frozen, pull the battery out and reinsert it
2.Hold the Volume Up and Volume Down buttons
3.Press and hold the Power button until the device turns on
4.Press and release the Volume Down button until Factory Reset is highlighted
5.Press and release the Camera button to select
All data including third-party applications will be deleted from the Dell Streak. Once the wipe is complete, the phone will reboot to its factory fresh state.

Regards
GX


Monday 14 March 2011

What is SIM-LOCK ?

Sim-lock, SP-lock, “coding” -
all these words have similar meaning:
a programmed limit in the phone to work with a single network.
A sim lock allows a network provider to prevent handsets from being used on other GSM networks.
Usually those handsets are sold with a discount, and the provider covers the price difference.
The handset stays inside the same network and within a year pays back the expenses of the service provider.

SIM-LOCK could be installed by the manufacturing or distributing company. The network provider orders some quantity of handsets from manufacturer.
The producing company supplies the phones along with the SIM-LOCK removing codes. The physical sense of
Sim-lock: there is a unique MCC/NCC code of the country and network saved in the SIM-Card.
Phone detects those codes when it's powered on. If they have coincided, the telephone works normally, other ways on display appears the following massage: “Invalid SIM” or “Enter the SIM-Lock code”. There are some other methods of coding the handsets, but the considered above – is the most widespread.

What is SIM LOCK ?
What sorts of lock are there?
1. Lock phone to SIM card. If your phone is locked to the SIM you cannot use any other SIM than the one you have: SIM broken makes phone useless. A SIM Card Lock is a lock programmed into a mobile phone which only allows one company's SIM to be used in the phone. The reasoning behind this is to keep your custom to that network. Simlocks are also referred to as SP Locks or Network locks. Once your simlock is removed you can place any (dependent on phone model) SIM card into it including foreign networks if you take the phone abroad.
2. Lock phone to Operator (Network or Service Provider) . If your phone is locked to an operator, you can use any SIM from this operator in your phone. You can switch between contract and prepaid as you wish, but not to a different operator.
.
3. Lock phone to CODE (Product Lock or Offer Lock). If your phone is locked to a code, the phone checks a special "password" (GID) on the SIM that must match your phone. Providers often use different passwords for contract and prepaid.
So unlocking is: Removing the locks on the phone so you can use the phone with any compatible SIM Card. Unlocking will allow you to use other service providers' SIM card. For example if you have an ABC GSM phone you can only put in an ABC SIM card, but if you unlock you can put in DEF XYZ, etc.
How can I verify whether my phone is SIM Card Locked?
If you place any card other than the one that the phone accepts, then you will get a message such as 'Incorrect Card', 'SIM Card not accepted', 'Enter Special Code', 'Enter NCK' or similar.
So unlocking is tampering with the software? - It can be, most programs to unlock on the internet change some data in the phone software other just make a log and calculate unlock code. You will have to type the unlock code with special code in your phone to unlock it.
Why should I unlock/upgrade my cellphone?
First of all we will give the reasons to unlock your cellphone: There are several providers in every country. A provider is a company from which you are using its network to communicate. Of course these providers are not all the same the one is better then the other. And ALSO the one is more expensive then the other. So if you buy cheap phone (that mostly comes with cheap provider because providers give money to make phones cheaper for us, and if the provider isn't that good, think about no network in distant places or in buildings, the provider has to find other way to get customers so they do it with making there mobiles cheaper) and then buy lose SIM card from better provider and you put in that SIM the phone says: 'SIM Card not accepted'.... (we are talking about prepaid phones here!!) Now there is the unlocking part When it is unlocked (or not locked, if you have contract your phone will likely not to be locked) you can put ANY SIM Card in it that you want.

Regards

Basic Information About Nokia.

Nokia Firmware Definition
APACAPAC = Asia-Pacific (Asia Pacific) is often the case with Flash files used to package the data clearly.
EMEA
EMEA = Europe / Middle East / Africa. Is often the case with Flash files used to package the data clearly.
EURO
EURO = Europe / Europe. Is often the case with Flash files used to package the data clearly.
LTALTA = Latin America. Is often the case with Flash files used to package the data clearly.
ALPS= ALPS Alps (Austria / Switzerland). Is rather rare in Flash files used to package the data clearly.
MCU (Master Control Unit)The MCU is the actual firmware / software in your mobile phone. In it lies the whole menu and all procedures used during the operation with the mobile run. The firmware is protected by checksums before manipulation. I.e. after a change in the checksums again corrected.
PPM (Post Programmable Memory)The PPM is the language pack in your mobile phone. It put all the texts / words that appear in your menu. All languages (German, English, ...) are stored there. There are different language packs for different languages in the phone. These are marked with a letter (eg A-Pack PPM, PPM-Pack B Pack C PPM, ...). When the menu changes are in the words being replaced by PPM. The voice packet is a checksum before manipulation. I.e. after a change in the checksums again corrected.
EEPROM (Electrically Erasable and Programmable Read Only Memory)The EEPROM is a memory area in the flash in the mobile-specific data is stored (such as operator logos, your own ringtone, profiles, also IMEI, security code, and much more). On it you have with a conventional data-cable access and can make changes while the software and the voice packet with a normal data can not access! On most phones, the Flash EEPROM is emulated implemetiert and, while in older models (such as 51xx, 61xx, 3210, 8810, the EEPROM as an additional chip on the phone board. This may be a flasher interface not be read.
PMM (Permanent Memory)The PMM is integrated in the Eeprom. Not to be confused with PPM!
Flasher interface
The Flash interface has been the end of 2000 by Dejan developed and disseminated. With him it is possible to flash memory, and therefore on the software in the mobile phone to access and edit. Normally one uses a flash interface for DCT-3 devices from Nokia.
Backup (short: Bu or FUBU)
As Bu (backup), a copy of the flash memory software, which with the help of a flasher interface was selected. For errors or incorrect manipulation can fuse again and again in the mobile phone, and thus to be primitive!
A FUBU (Full Backup) includes the additional Eeprombereich.
Checksums
Checksums are certain number of consequences, from a file (in this case a flash file) is calculated to prevent a modification / manipulation to protect. If for example A Flash file changed, the internal Checksum not agree more, and the backup is useless because the phone after the re-import "Contact Service" on the LCD display! Meanwhile, it is possible thanks g3gg0 these checksums to avoid, ie it is possible to all DCT-3 mobile phones from Nokia to manipulate. It works now (3330, 3410, 5210, 5510) WUG (wakeup Graphic)
WUG called the startup logo.

Sunday 13 March 2011

How to know Your Mobile Phones Quality?

How to Know Your Phone Assemble in which Country and quality...

Press Code on standby mode *#06#  it will shows 15 digits of serial number
Called IMEI( International Mobile Equipment Identity)
Check the 7th and 8th numbers digits.
 Eg-; 352032123456789
If 7th 8th digits `02-20 it means Your phone assembled in UAE and Bad quality.

If 7th 8th digits 08-80 it means Your phone assembled in  Germany and good quality.

If 7th 8th digits 01-10 it means Your phone assembled in Finland and its very good quality.

If 7th 8th digits 00 It means its assemble in original factory and best quality.

If 7th 8th digits 13 it means Your phone assembled in Azerbaijan its very bad quality.

GsmXplorer

Saturday 12 March 2011

First Aid Tips on Mobile Affected Waterfirst Aid Tips on Mobile Affected Water

* If your phone is submerged, remove the phone from the water as soon as possible to prevent the component parts of the contaminated water. In some cases, mobile phone casing is tight enough to prevent water seepage. But this will only last for several tens of seconds.
* Immediately remove the battery from the phone. Angatlah cut off the flow of resources essential to minimize the possibility of damage to the phone. Several electronic circuits otherwise can remain in a state of wet, if not connected with resources.
* Immediately remove your SIM card as well to prevent possible damage or loss of data. You certainly do not want your important phonebook or SMS disappeared. Let your SIM card until it is completely dry before you check its condition.
* Dry the phone until it is completely dry. Use a cloth that can absorb water. If there is, also use a hair dryer hair dryer alias. But make sure your phone do not get too hot. Do not also put it in the microwave. Phones that are too hot can explode reported.

* Test the condition of your phone after it is completely dry. If the phone crashes, check whether your cell phone or battery is damaged, using a spare battery. If only the battery that is damaged, you simply buy a new one.
* If all the steps you have done but the phone still had damage, what may make, you seem to have to rely on phone service technician. But remember, you have to look for technicians who trusted and affordable mobile phone.

Regards
GsmXplorer